Science of Cookies
Hi!
Thank you for joining our cookie science class! This is a one-time video-based class. Here you can find the recording, the slide deck as well as a recipe to test at home!
Recording
This class was given live on Dec-2nd 2021. Here, you can watch the recording of the class in case you missed it, or if you want to look at a certain part again. We’ve added time stamps below if you’re interested in a specific section!
Time stamps
| Time | Content |
|---|---|
| 3:50 | Introduction to cookies & the use of flow diagrams to discuss cookies |
| 7:15 | Shortbread example – analyzing a shortbread cookie using a simple flow diagram |
| 9:00 | Role of ingredients in cookies with a focus on sugar, butter and flour |
| 15:26 | Role of ingredients in cookies – example with corn & potato starch |
| 18:00 | Prepping ingredients & Making the dough |
| 25:15 | Analyzing the impact of baking on cookies |
| 26:10 | Analyzing the impact of baking on cookies – Impact of size of the cookie |
| 28:25 | Analyzing the impact of baking on cookies – Impact of the tray |
| 32:28 | Analyzing the impact of baking on cookies – What happens in the oven? |
| 35:55 | Analyzing the impact of baking on cookies – Example demonstrating the impact of temperature & parchment paper |
| 39:07 | Types of cookies – and how that impacts making them |
| 40:40 | Storing cookies |
| 45:55 | Attendee question 1: Altitude Baking |
| 49:43 | Attendee question 2: Impact of type of flour |
| 57:47 | Looking at and discussing 3 types of freshly baked cookies – demonstration |
| 1:02:02 | Looking at and discussing 3 types of freshly baked cookies – WHITE vs BROWN sugar |
| 1:04:50 | General tips for experimenting with cookies |
| 1:09:30 | Further learning resources & Closing |
Slide deck used in the class
As we mentioned in the class, 1-hour isn’t enough time to discuss all things cookie science! There is so much to discuss, so we decided to focus on the core aspects. Luckily, we have a lot more information on our website. In the deck below you can find various blue ‘LEARN MORE’ links. These will bring you to an article on our website that discusses the topic in more detail. If you still have more questions, leave a comment on that specific post, at the bottom of this page, or just send us a note at courses@foodcrumbles.com.
Recipe
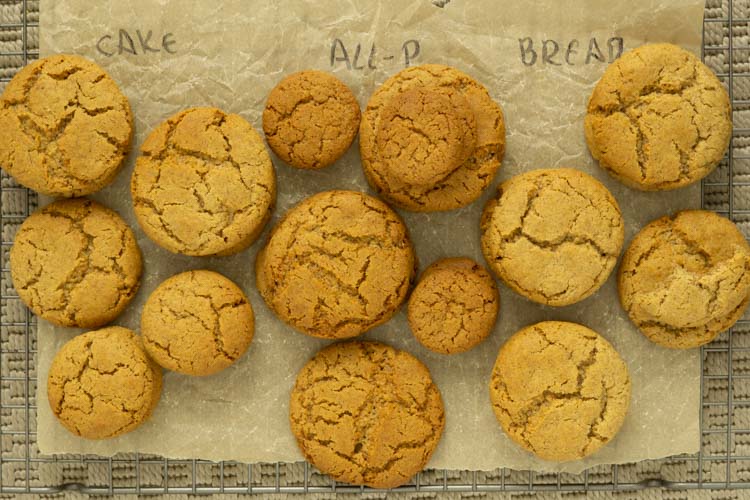
Want to try your hand at some of the experiments we did in the class? We used this recipe below for testing out the different types of flour.
Spiced Sugar Cookies
This is the cookie we used to test the impact of the type of flour on its texture. The recipe is based on one from the Ultimate Cookie Handbook (by Tessa Arias), a book we'd recommend if you'd like to learn more about cookies.
Ingredients
Butter + Sugar mix
- 140g unsalted butter (softened)
- 200g white sugar
- 30g honey
- 1 egg
Spices
- 2 tsp baking powder
- 2 tsp cinnamon
- 1 tsp corn starch
- 1 tsp cardamom powder
- 1/2 tsp ginger powder
- 1/2 tsp allspice
- 1/2 tsp clove powder
- 1/8 tsp salt
Flours
- 90g low-protein flour (e.g. cake flour)
- 90g medium protein flour (e.g. all purpose flour)
- 90g high protein flour (e.g. bread flour)
Instructions
Prep butter + sugar mix
- Weigh an empty bowl.
- Add the butter + sugar. Using a mixer, mix together the butter and sugar until they're homogeneously mixed.
- Add the honey and egg and mix again.
- Weigh the full bowl and calculate how much your butter mixture weighs. You will have to split this into three equal portions.
Prep spices
- In a separate bowl, blend all the spices together.
Make three doughs
- Take three bowls and add a different type of flour in each bowl (90g per flour type).
- Split the spice mix in three equal portions and mix through the flour using a fork or spoon to ensure the spices are mixed through well. You will have approx. 2,5 tsp of spice mix per bowl.
- Split the butter+sugar mix into three equal portions and gently mix this through the flour. Use a fork or spoon at first and finish off by hand.
- Split each dough portion into 8 equally sized portions.* Shape each into a nice round ball.
- Place on a baking sheet making sure to either label or remember which sheet contains which cookie!
- Place the sheets into a pre-heated oven at 160°C (320°F) for approx. 15 minutes, until they are a nice light brown. If you want crunchy cookies, bake an additional 2-3 minutes.
- Take the sheets out of the oven and leave to cool for a few minutes before taking the cookies off the sheet and cooling them on a rack.
- Once they've all cooled down, taste and compare! Did you find any differences between the three batches? If so, which?
Notes
*If you also want to test the impact of the size of your cookie on how it turns out (as we did in the class as well!) simply split some of the portions in half or even in quarters to make smaller cookies.
Questions or Suggestions?
Have any questions or suggestions? Please reach out to courses@foodcrumbles.com or leave a comment at the bottom of this page.